
Server Build 2.0 Part 2 – pfSense and HAProxy
In the first segment of this new series, I gave you a quick rundown of the changes since my first home server 10 years ago. Now let’s get into the fun stuff. VLANs, reverse proxies, and firewall rules, oh my. Originally I had a Netgate SG1100 firewall. It worked fine, but eventually the hard drive failed. It was also underpowered for my new gigabit speeds. I could buy a new one, but what’s the point. I didn’t want to spend the crazy money for an enterprise level firewall. So I got a Beelink mini PC.
The SG1100 was designed by the people who do pfSense. However, pfSense is not limited to just their hardware. You can install it on just about anything with two ethernet ports (one to connect to the modem and the other to connect to your internal network). Since I was already familiar with pfSense, I decided to stick with it, and put it on the Beelink.
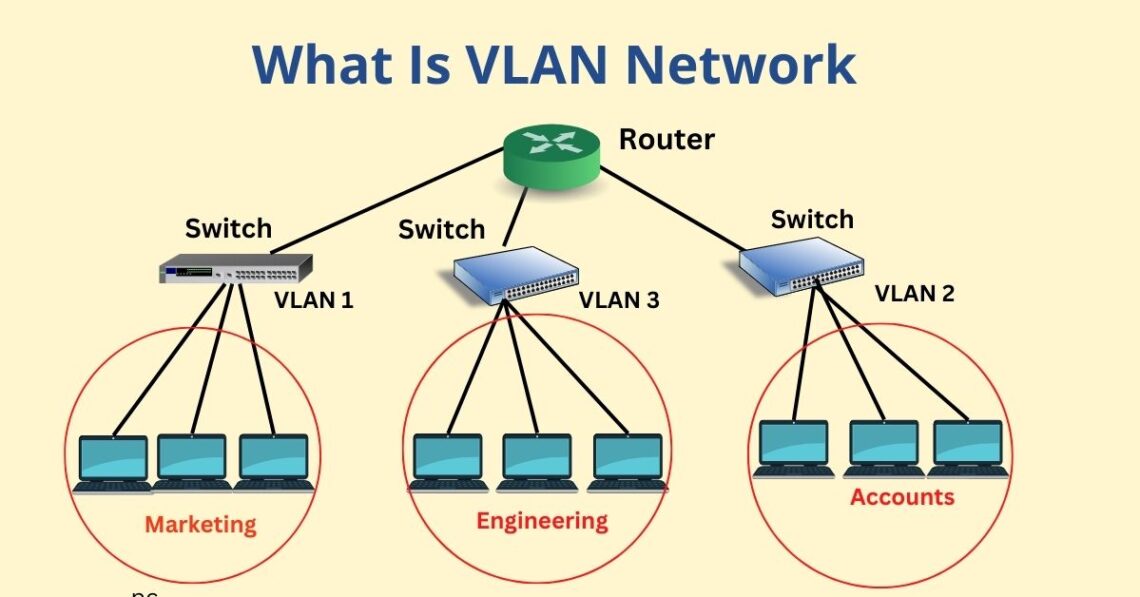
A VLAN is a virtual local area network. This is a way to segregate your physical network into multiple virtual networks. A common example is a guest network. If you work for a business that offers free wifi to your clients, you don’t want them to have access to your important systems. But you also don’t want to have to buy double of all the APs (access points), and routers, and cables. So you’d create a separate VLAN. Both VLANs would run on the same hardware, but they’d be two different networks.
In my case, I have four networks. VLAN1 (Management. This is for the infrastructure itself. The switches, the server, the APs), VLAN10 (IOT for… IOT devices.), VLAN20 (Default. For my every day use.), and VLAN30 (guest). Originally I wanted a 5th VLAN for my security camera systems. Then Unifi said “no”, so I had to merge it with the IOT network. The steps to create VLANs are pretty simple. I used a simple DHCP IP scheme, where the third segment of the IP address is the VLAN ID. Thus, 192.168.20.123 is on the default network, and 192.168.10.123 is on the IOT network. pfSense is awesome, and I setup my PiHole as the DNS server. I added the networks to my Unifi controller, and created separate SSIDs for each VLAN. Unfortunately, Unifi APs are limited to 4 SSIDs unless you want to turn off the mesh function. The mesh function means that if you get too far away from one AP, you’ll automatically connect to a closer AP. Definitely want that feature. Each SSID is linked to a specific VLAN. If you connect to the default wifi network, you’ll get an IP in the default VLAN and be bound by the firewall rules for that VLAN. Super easy.
Next let’s address the firewall rules. pfSense allows you to create rules per network, and they follow a priority system where the rules on the top of the list are used first, then work their way down. To create a rule, you set the port affected, the source, the destination, and the action.
*, VLAN10, *, Block <- This means that any (*) port on the IOT (VLAN10) network to any network is blocked.
443, VLAN1, VLAN20, Allow <- This means that port 443 connections from the management network to the default network are allowed.
Those are just examples. In my case, VLAN1 has access to everything. The IOT network is limited to only itself. And I further limited it so that only specific devices can connect the outside internet. IOT devices are notoriously insecure, so I want to limit my attack surface. The default network mostly just connects to itself, but I did create some allow rules to specific devices on the IOT network, so I can manage Home Assistant, for instance. The guest network can only connect to itself and the outside internet. Now, when I say that a network can only connect to itself, I mean that it can talk to other devices on that same network. Home Assistant can connect to the security cameras because they are on the same network, but it can’t connect to my server, because that’s on a different network.
So, let’s say you connect your device to the guest wifi. That connects to one of my Unifi APs. The AP pipes the connection through VLAN30. It goes to pfSense. pfSense sends your traffic to the PiHole. The PiHole blocks the ads, then sends the rest to the internet. If you tried to connect to, say, Home Assistant which is VLAN10, you’d get a “page cannot be displayed” error. Yay security.
pfSense has a lot of other features. You can setup a VPN. You can use it as an adblocker (but I prefer Pihole). You can also block known bad traffic. I use a plugin called Suricata. It checks a database a few times a day for new “fingerprints” of known attack behavior. It then ties in to the firewall rules, and blocks anything that matches those fingerprints. Let’s say a particular trojan is known to act a certain way and connect to a certain IP. If Suricata notices a connection request to that IP, it blocks it. It does require some configuration. At first there are a lot of false positives. But it’s better to be safe than sorry.
Since I plan on exposing some services to the outside world, I have another thing I need to solve. My external IP address from my ISP. By default, this IP address changes periodically. I need the domain name to point to that IP address. If not, then nothing works. But if the IP changes randomly, I’d be forced to constantly update the DNS records and wait an hour or two for those to update. I’m far too lazy for that. There are two options here. One, is request a static IP (IP address stays the same) from your ISP. Some offer this for a few dollars a month. Mine doesn’t. The second option is called “Dynamic DNS”. This basically checks the IP address every few hours, and then updates the DNS records for you. It’s all automated. And luckily, pfSense can do that for you. I just had to create and API token with my DNS Registrar, and add that to pfSense. Then tie it to the specific domains. Easy.
Now we move on to HAProxy. Though realistically, this is one of the last things I setup. A standard proxy hides the USER when connecting to a server. A reverse proxy hides the SERVER when a user connects to it. In my case, since my server is sitting in my livingroom, connected to all my cool stuff, I don’t want attackers to get in. A reverse proxy is the perfect solution. The user connects to the reverse proxy, not the server.
Originally, I had tried Caddy. I like the idea of Caddy. It does the reverse proxying. It automatically pulls SSL certificates (so you don’t get the “page not secure” error). It even updates the certificates when needed. Plus, I could install it in Docker. But for some strange reason, it would only work on Docker containers on that same machine. It is supposed to support connecting to other devices, but that never worked for me. It was super frustrating. I was kind of stuck at this point. I had a cool idea. I had most of the pieces in place. But this one dumb thing was holding me back.
Luckily, I found the second video below. HAProxy does the same basic thing, but it’s a plugin for pfSense, the main hub of everything. Setting it up was pretty straight forward. I found that the SSL process didn’t work for my registrar, but if I did “manual DNS” as the provider, that worked perfectly. The idea is that you forward port 443 (HTTPS) on your modem to pfSense. Then HAProxy listens on 443 for requests. The “frontend” has specific requirements. If the domain that was entered matches one of those requirements, it then passes the connection to the appropriate “backend”. Thus, chrisdantes.com matches the requirement, and is passed on to the docker container running this site. If you tried… nonsense.chrisdantes.com, it wouldn’t match the frontend, so the connection would be dropped. And all of this comes with SSL.
There’s one issue I’ve yet to resolve, and that is local DNS. Let’s say I’m at home, on my home network. If I try to connect to chrisdantes.com, it creates a loopback, where the outgoing connection is trying to come back in. I’ve tried a few different things, but can’t get it to work. So when I’m at home, I have to type in the IP addresses of each service. Not a big deal, but kind of annoying.
Next time, we’ll get into the Docker and Proxmox goodness.
Oh. And I got Wazuh installed and a few agents running. Now to figure out what to do with that.
For more detailed instructions, I’d highly recommend the Lawrence Systems YouTube channel. Here are some videos that helped me.
Chris Dantes
My name is Chris. I currently live in Seattle, though I’m formerly from California. I'm a writer, comic, and superhero (allegedly). I complain. A lot. About everything. I also tell jokes.

